I’m struggling to work out how I can create a similar layout to one I would make in FW, e.g. by inserting 4 HTML Items with a width of 25% into an HTML item and choosing Float Left for these items. The end result being 4 boxes, side by side.
Specifically in Xway, I’d like to have an image box, a text box and another image box at the same level of the page.
On Jul 4, 2020, at 8:03 AM, grantsymon email@hidden wrote:
I’m struggling to work out how I can create a similar layout to one I would make in FW, e.g. by inserting 4 HTML Items with a width of 25% into an HTML item and choosing Float Left for these items. The end result being 4 boxes, side by side.
Specifically in Xway, I’d like to have an image box, a text box and another image box at the same level of the page.
Xway doesn’t support float directly (yet), but you can do this using extended style properties: select an item that you wish to float, open the Extended Properties section in the Box Inspector, click on the plus icon, and type “float” for Name and “left” for value (both without quotes).
Using float as a general layout method (rather than for floated images etc.) can be problematic, and sometimes requires additional hacks (such as clearfix). An alternative (better) way of distributing items is to use flexbox:
Xway doesn’t support flexbox directly (yet), but extended properties can be used once again: this is how the boxes near the bottom of our Xway page (“Built for HTML and CSS from the ground up”) are laid out.
That css-tricks guide was invaluable when I rebuilt the Cotswold Engineering Supplies site a few years ago in Freeway. It meant I could build a responsive site easily (relatively speaking) as it required a lot of extra styles added via CSS: ID - Class FW-7 Action.
Once you get your head around it, it allows you great control of how your site looks, smoothing out some rough edges that sometimes happens when you have more than one box in a row with different heights.
I’m sure you’ll find it useful.
I’ll be delving into Xway soon to start preparations for the transfer of that site to the new kid on the block!
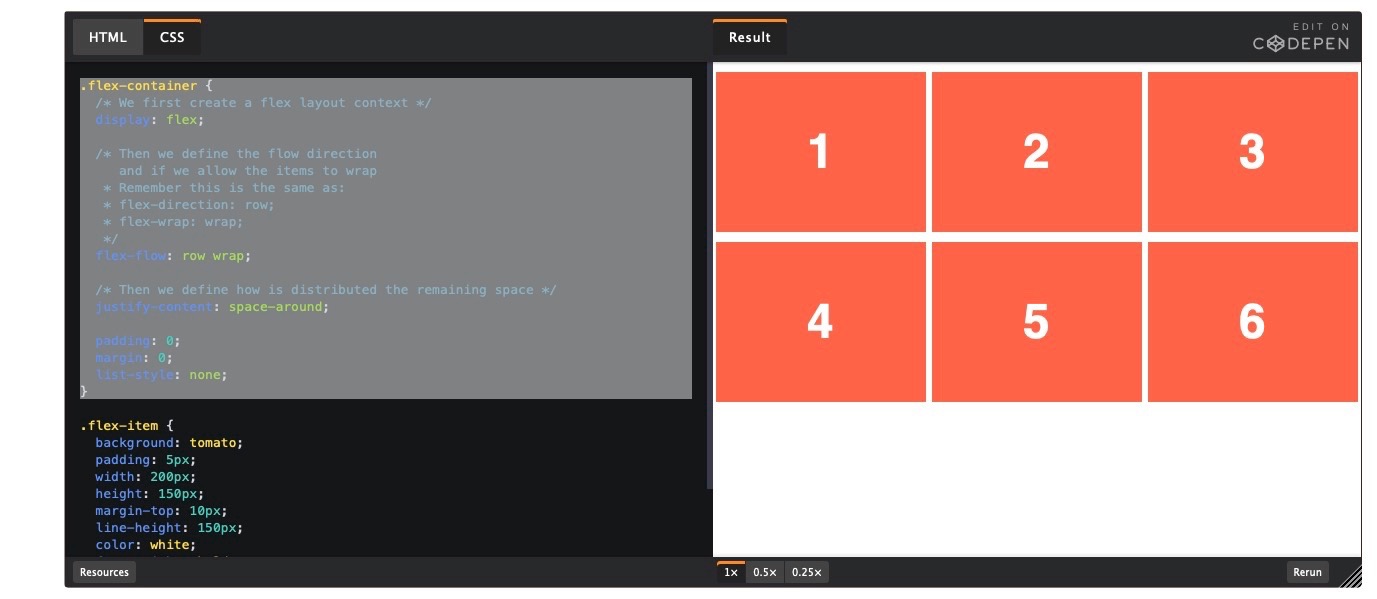
I’m just coming back to this and am a bit embarrassed that I’ve fallen at the first hurdle. I’m simply trying to emulate the example on the Guide to Flexbox, which looks like this:
For the container item, delete everything you have added in Extended Properties, then click on the plus button in Extended Properties and enter:
Name: display
Value: flex
Then create a second property:
Name: flex-flow
Value: row wrap
For the child items, delete everything you have added in Extended Properties. If you want to set a background colour or size, you can do this in the normal way (without using Extended Properties). You might want to use percentage widths (e.g. 25%) rather than pixel widths.
Jeremy
—
On 13 Jul 2020, at 15:17, grantsymon email@hidden wrote:
I’m just coming back to this and am a bit embarrassed that I’ve fallen at the first hurdle. I’m simply trying to emulate the example on the Guide to Flexbox, which looks like this:
guide-to-flexbox
This is what I’ve tried, using extended properties for the container and the boxes inside it:
flexTest.zip
Can anyone tell me - where I should be entering the code/why it’s not working?
For any Property, e.g. flex-flow, you can add their Values as space delimited items. No need to describe them in any other way?
That’s right. Properties often have a single value, but you can add several values. The most important property here is Name: display, Value: flex.
What you originally added were complete CSS styles, including comments and various properties. You might type this if you were coding by hand, but you don’t need it if you’re using Xway.
If you’re mixing Graphics and Boxes (text) inside the same container (on the same page level) then they need to be inside their own Boxes, otherwise it seems that Paragraphs come in to play and none of the CSS works as desired.
Can anybody clue me in on a usage format for Xway please?
name= display
value= ? : if I want to add 3 child to a parent container?
or if I want to add 5 child boxes to a parent container with a wrap?
or if I want to specify the sizes of the boxes in the container and then qty 3 boxes , set to wrap?
Start by creating your parent box, then add the child boxes in that.
Give the child boxes widths that would allow them to fit beside each other – they will start off full width. They won’t actually BE beside each other but make sure there’s room.
Give each one of these its own background fill colour so you can easily see which is which.
Then select the parent and go to the Extended Properties pane. (NOT the Extended Attributes pane!) Give it these two extended properties:
NAME: display VALUE: flex
NAME: flex-flow VALUE: row wrap
Preview and try resizing the browser window to see how things adjust. Basically, the parent container tells its children how to behave. You don’t need to use code or properties to create the children OR tell them directly how to behave. There are quite a few other options you can play with but this should get you started.
Seriously… THANK YOU!
I really can’t wait for Xway to be a full fledged app.
Trying to produce two replacement websites that I originally built in Freeway,
Is kinking my butt.
I need a decent WYSIWG product that offers the ability to setup custom attributes,
If they are needed, without having to research hand coding to complete the task.
• Start by creating your parent box, then add the child boxes in that.
• Give the child boxes widths that would allow them to fit beside each other – they will start off full width. They won’t actually BE beside each other but make sure there’s room.
• Give each one of these its own background fill colour so you can easily see which is which.
• Then select the parent and go to the Extended Properties pane. (NOT the Extended Attributes pane!) Give it these two extended properties:
• NAME: display VALUE: flex
• NAME: flex-flow VALUE: row wrap
Preview and try resizing the browser window to see how things adjust. Basically, the parent container tells its children how to behave. You don’t need to use code or properties to create the children OR tell them directly how to behave. There are quite a few other options you can play with but this should get you started.
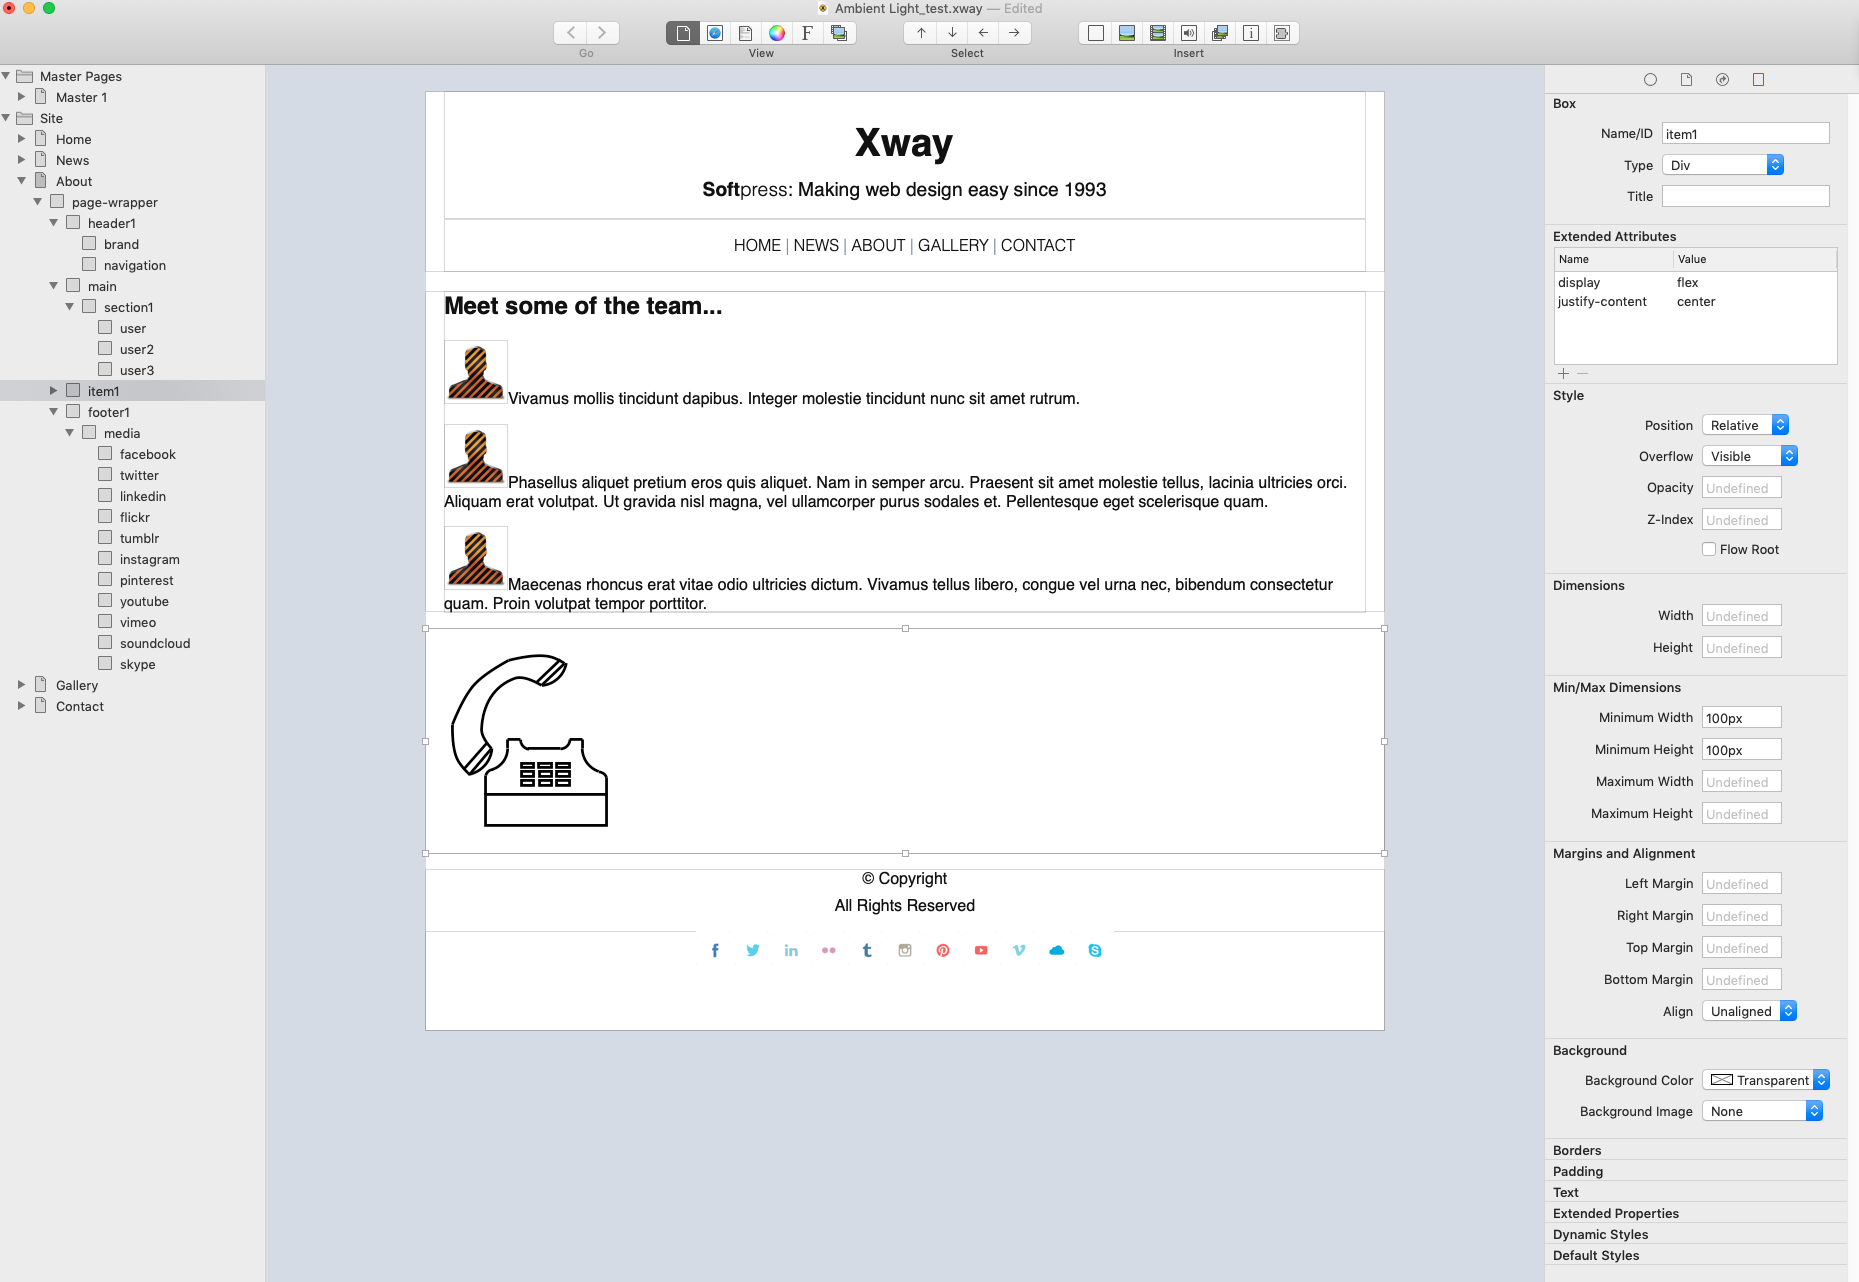
Hi Jeremy. Like gsymon, I am also struggling with graphic boxes: to get an image box to be central on a page – see attached image. I have read the Flexbox guide, and have tried a number of ways of entering information in the ‘Extended Attributes’ box. But, I cannot get a ‘phone’ image to centre align on the X-Way page.
I tried applying the attributes to just the container, the box, but, the image refuses to centre align on the page. What am I doing wrong?
Centring a graphic is the same in Xway as it is in Freeway (if you previously used Freeway). Graphics are inline items: you can centre-align them in the same way that you would centre-align text:
Select the graphic
Press right-arrow so you have a text cursor
Click on the centre-align button in the Paragraph Inspector