What the Action can do: This Action lets you do the following:
- It lets you create an HTML email to send out through an email blast service.
- It makes sure all your graphic resources required for your HTML email can be found when it is read in a recipient's email client.
- It lets you create a plain text email.
It is important, however, that you appreciate the limitations of what will display reliably in the huge amount of different email applications used by customers today. Email applications and webmail services are notoriously picky about the structure and form of the HTML in these emails as they only support a fraction of the features offered in modern web browsers. This means that it will always be difficult to create an HTML email which looks great in all email clients.
We strongly recommend you use only table-based layouts and don’t use JavaScript. This means that Rollovers and Target images shouldn’t be used and Freeway Pro users should make sure that the CSS Layout button is switched off while you work. The general rule of thumb is that the simpler the layout, the more reliable it will appear in whatever email client your customer uses.
Before you start
Before creating your email file in Freeway, you need to decide which working method you want to use. You can either create the email as a new page of your current site (inside a new folder in your Site Panel), or you can create a new file independent of your current site file. The first method is the quickest and simplest as Freeway will do all the work for you.Creating an email within your current site
To make the email within your current site, go to Page>New Folder, give this new page folder a name (perhaps “email”, without the quotes) and click OK. Now, with the folder selected in the Site Panel, go to Page>New Page, give the page a name then click OK. Because the new page is in a new page folder, this will create a specific directory on your web server when you next upload the file, and this directory is the one your email will use for its resources.The Create Email Action requires you to enter a URL to use for the “absolute” links it needs to create so, with the file open, go to File>Document Setup, make sure the External Stylesheets option is not checked then click on the Upload tab. In here, enter the URL for your site (which will be something like http://www.mydomain.com) in the Web Address field and click OK.
Note that some Actions also require you to enter a URL in the Web Address field, so if there is already a URL set, ignore this last step.
You can now use the new page you just created for your email.
Creating a new file for your email
If you want to create a new file to use as your email there are again two methods. The first method can all be done in Freeway—the second requires you to use a standalone FTP application (such as Cyberduck, Fetch or Transmit) and also an understanding of the differences between the path names used by FTP and HTTP. Here we will use the first method—the second method is covered on the Softpress KnowledgeBase.Freeway is not a specialist FTP application, so you first need to create a new page folder on your original Freeway file which can be used as a location to store your email file’s resources.
To do this, open your original site file, go to Page>New Folder, give this new page folder a name (perhaps “email”, without the quotes) and click OK. Now, with the folder selected in the Site Panel, go to Page>New Page, give the new page a name then click OK. To complete this step, upload your file so that Freeway will create the new directory on your web server.
After the upload is complete, close your original file then create a new file in Freeway by going to File>New. Note that Freeway Pro users should not use HTML 3.2 as the Action is only compatible with HTML 4.01, XHTML 1.0 or later.
With the new file open, go to File>Document Setup and make sure the External Stylesheets option is not checked. Now click on the Upload tab. In here, use exactly the same upload details as used for your original Freeway file, but note that you need to add the name of the new page folder you created earlier in the Directory and Web Address fields. Because different hosts use different structures on their web servers, you will need to use either one of the following two methods:
- If your host requires you to use a specified directory (so you have a directory name, or multiple directory names, entered in the Directory field), add a forward slash (/) and the name of the new page folder to what already appears there. Depending on the name your host requires you to use, this means that you need to use something like htdocs/email, public_html/email or whatever other name your host has instructed you to use. If you used a name for the new page folder in your original Freeway file other than “email”, change “email” to the name you used.
- If your host requires you to upload your files into the root level of your web server (ie, no specific directory is used), simply enter email (or whatever name you gave to the new page folder in your original Freeway file) into the Directory field.
Note that the address used in the Web Address field does not require the name of the folder used for the HTML files on your server (such as “htdocs”, etc.).
You can now start to create your email file.
Using the Create Email Action
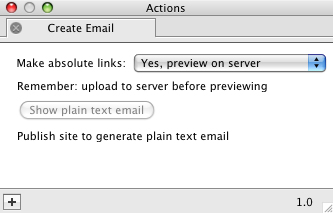
Go to Page>Page Actions and choose Create Email from the list. With nothing selected on your page you will see the Actions palette displaying the options for the Create Email Action.
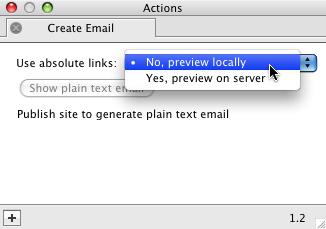
We recommend you click on the Make absolute links popup and change it to No, preview locally while you are building and testing your page ‘locally’ on your computer. When you have finished building the page, upload the file (Freeway will use the details entered earlier in the Upload dialog).

When the upload is complete, click on the popup again and change it to Yes, preview on server and then preview the file in a browser. This will rewrite all of the image links to point to the images stored in the email folder on the server, and it restructures the styling used for the HTML text of your email.
Getting the HTML code to use
Check that everything is fine with the layout, etc., and—once you’re happy—view the source code of the page in the browser, select it all and copy the HTML. To do this in Safari, go to View>View Source; in Firefox, go to View>Page Source.Unless you are sending out your emails manually using Apple’s Mail application (see ‘Sending out your email’ below), we recommend you copy the source code and paste it into a true text editor (such as the free TextWrangler from http://www.barebones.com) then save the file to your hard disk.
Creating a plain text email
You can also use the Action to create a plain text email so it can be handled by email applications or mailing services which don’t support graphics.Once you have previewed the page in a browser, click on the Show plain text email button. This will extract all of the text from your page and will attempt to form it into a plain text email.
The plain text will appear in a new file in your computer’s default text editor which is launched automatically by Freeway.
Although the Action does its best to decide where text appears in the flow of the page it can sometimes require manual editing to correct any minor errors in the extraction process—and this will need to be done in the text editor.
Once you are happy with the order in which the text appears in the text editor, you can save the file to your hard disk.
Sending out your email
There are quite a few methods you can use to send out the HTML or text email generated by the Create Email Action.The simplest method is to send the email out from Safari without the need to copy the source code of the file. To do this, preview the Freeway file in Safari then go to File>Mail Contents of This Page. Doing this will launch Apple’s Mail application and the page will appear in the main panel of Mail’s window. All you need to do then is to enter the recipient’s email address in the “To:” field (or use a predefined contact group in the Address Book), enter a Subject and send the email.
This is fine if you use Mail as your email client but this method won’t work with any other email application—and it is just a very basic method of sending out the email.
You may prefer to arrange for a specialist company to send the email out for you or set up an account with an online emailing service so you can track the effectiveness of your email “campaign”.
There are many companies who offer emailing campaign services—such as MailChimp (which currently offers a free basic service limited to 500 subscribers and 3,000 emails per month), Vertical Response and Campaign Monitor. You can see their websites at:
- http://www.mailchimp.com
- http://www.verticalresponse.com
- http://www.campaignmonitor.com
A good email marketing service will allow you to create lists of email addresses online and can also monitor your email campaign to give you statistics on how many emails were opened by the recipients, how many were bounced, etc.
Note: Depending on the service you decide to use, the process of supplying the files for the HTML email can differ—so you may need to adjust your workflow to suit their particular process.