This is a (very) basic step-by-step on how to use custom CSS Text Styles in a Freeway document. If you prefer to print off some pages to read (rather than read this long KnowledgeBase article), you can use the link below (under Attachments) to download a printable PDF file.
Although you don’t need to, it’s best to start with a new blank document so it’s clearer to see what styles you have created. Ideally a lot of this should be done at a very early stage of the design and creation process for a site.
The first thing to state is that you should avoid mixing and matching “permanent” custom CSS styles (ie, those you have created in the Edit Styles dialog) with “temporary” styles (ie, those where you choose an attribute for text in the General Settings tab of the Inspector). Where possible it is always best to set up permanent styles by creating variations of your common styles - this will be explained later.
If you apply any attribute (font, size, etc.) in the General Settings tab of the Inspector, Freeway will create a new temporary style - and this is why you may have seen a long list of styles (called .style1, .style2, etc.) used in your site. You need to be aware that if you delete the only text with this temporary style applied, it will not then be available in the list of temporary styles - so this is not a recommended method of styling your text.
As with all design projects it’s best to establish a basic set of styles to use throughout the project - the smaller the set of styles the better, as this will help to keep a standard appearance throughout your site. A good starting point is to establish a style for your “bodytext”, along with some basic variations (perhaps one centered, another in a different color and another in a smaller size) and then set up two or three heading styles.
To begin with, let’s set up a default “bodytext” style which will be the style that is used when you create an HTML text item and start typing.
- Go to Edit>Styles.
- Click on the “+” button in the bottom left of the dialog (to create a new style).
- Enter “body” (without the quotes) in the Tag field and remove anything from the Name field (ie, leave it blank).
- Click on the “+” button to the right of Character and choose Font from the list. Choose Verdana in the uppermost Font popup.
- Click again on the “+” button again and choose Size. In the left-hand Size field choose 12px.
- Click on the “+” again, choose Color and choose Blue from the Color popup.
- Click OK in the bottom right of the Edit Styles dialog to save the style.
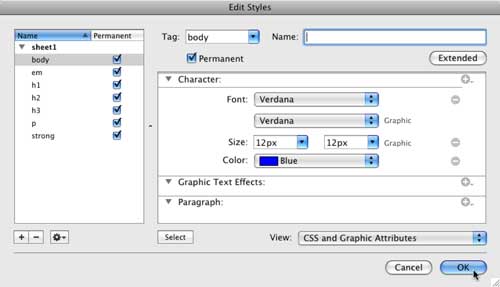
Draw an HTML item on your page and enter some text. The text you type will automatically be in the “body” style that you have just set up. This will be the same for all HTML text as the default style. If you go to the Styles tab of the Inspector you will see that “body” is not listed—this is because it is now the default style.

If you want to make any bodytext bold you should select the text, go to the Styles tab of the Inspector and choose strong from the list. If you want to make any text italic, select the text, go to the Styles tab and choose em (for emphasis) from the list. Using strong and em like this will mean that you won’t create new temporary styles in the same way you would if you change the Style attribute in the General Settings tab of the Inspector.
Now let’s set up some variations for the bodytext style. Go to Edit>Styles, click on the “+” button in the bottom left to create a new style. Leave the Tag field blank and enter “bodytextcentered” (without the quotes) in the Name field. Click on the “+” button to the right of Paragraph, choose Align, click on the Center Align button and click OK to save the style. If you select some text on your Freeway page and then go to the Styles tab of the Inspector and choose .bodytextcentered you will see that the text is now center aligned.
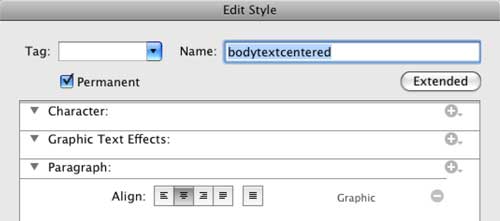
Note also that, because the style has a “paragraph” attribute applied (ie, Align Center), there is a paragraph mark to the left of its name in the Styles list. Any style that has an attribute which can only be applied to the entire paragraph (rather than individual characters or words within the paragraph), such as Align or Left Indent, will display this paragraph mark to alert you to the fact that this will affect the entire paragraph.
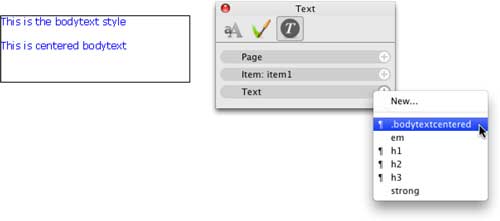
Now let’s make a variation of the bodytext style in a different color. Go to Edit>Styles and click on the “+” in the bottom left again to create a new style. Leave the Tag field blank and enter “bodytextred” (without the quotes) in the Name field. Click on the “+” to the right of Character, choose Color, then choose Red from the Color popup and click OK.
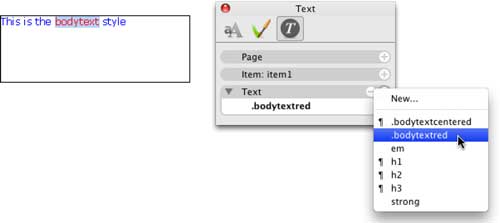
If you now select some text in Freeway and apply this style the text will change to red. Note that this style doesn’t have the paragraph mark displayed next to the style in the list of styles—this is because there are no paragraph attributes applied to the style.
For the final variation of the bodytext style, let’s set up a style using a smaller font size. Go to Edit>Styles, click on the “+” button in the bottom left, leave the Tag field blank and enter “bodytextsmall” in the Name field. Click on the “+” button to the right of Character, choose 10px from the left-hand Size popup and click OK to save the style.
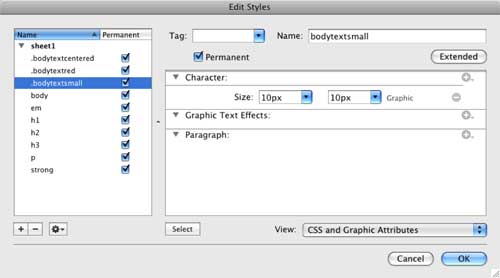
Using this method you will now have a bodytext style along with three variations (plus the option to use bold and italic text)—and this has been achieved with an uncluttered styles list of just three new custom styles in your list of permanent styles.
It’s up to you which (and how many) variations you set up—but by planning ahead to establish these common styles you can streamline the workflow to get the text throughout your entire site looking consistent.
There may be some text which you don’t want to be based on the bodytext style—in which case you can simply create a completely new style. To do this, you will need to change each of the attributes used in the “body” style to over-ride those which are applied by default.
Setting up styles for commonly-used headings is also a very quick and simple task. In fact, you may want to just use the default “h” tags (h1, h2 and h3) which already appear in the list. You do, however, need to be aware that these heading styles will always be in bold, even if you switch the Bold attribute off in the Edit Styles dialog. If you want to use a heading which is not in bold, it’s best to create a new style instead using the method already covered.
Let’s set up a custom “h1” heading style—this time we will use graphic text so that a very specific font can be used even if the site visitor doesn’t have it on their computer.
Go to Edit>Styles and select h1 from the list in the left-hand panel. Click on the “+” button to the right of Character and choose Force Graphic Character. Click on the second Font popup (the one with “Graphic” on the right) and choose Zapfino. Click on the “+” button again, choose Size and select 24px from the Size popup list. Click OK to save the style.
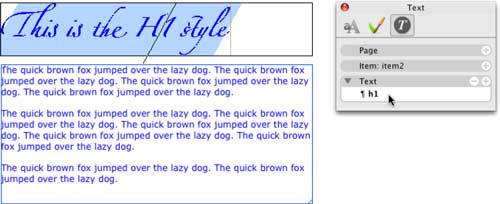
If you type some text in Freeway and apply the new H1 style to it, you will see that can use graphic text as a custom CSS text style, although you need to bear in mind that this is not HTML text—it is simply graphic text which has been defined through Freeway’s style feature.
You will notice in the screenshot above that even this new H1 style is picking up the blue which was applied to the default “body” style. As stated earlier, you need to specify all the attributes you want to use in your style to make sure they over-ride the attributes in the default text style.
Hopefully, this brief tutorial (which is only scratching the surface of the very powerful custom CSS styling feature of Freeway Pro) gives you a good starting point.
It is often tempting to use the shortcut of selecting some text and then applying an attribute in the General Settings tab of the Inspector—but it is good practice to avoid this temptation.
Although the styling will work by applying it in the General Settings tab of the Inspector, this will simply create a new temporary CSS text style and it will be given a generic name (such as .style1) which makes it very difficult to manage the styles of your site when you revisit the project at some time in the future.
_________________
Although Freeway does its best to display the text as “wysiwyg” (“what-you-see-is-what-you-get”), there are some attributes which vary greatly from one browser to another when you preview your site in a browser. One of these is the “Leading” attribute, which is the equivalent of “line leading” in Desktop Publishing (ie, it affects the space between the lines in a paragraph). Visitors using Internet Explorer for PC will see the amount of leading is very different to that displayed on a Mac (this is simply due to the way that IE interprets the attribute).
One thing which is easily controlled by setting up a custom CSS text style is the inter-paragraph space which HTML text uses by default. This is done by changing the “Space Before” and “Space After” attributes in the Paragraph attributes of the Edit Styles dialog. Note, however, that if you want to have no extra space between paragraphs in HTML text, you will need to set both attributes to 0px (this is a quirk with how HTML works).
custom css styles.pdf (274.0 KB)