Here, however, are some steps to offer a quick and simple method of using buttons to enlarge and reduce the size of all HTML on a page. Due to its simplicity, there are a few limitations - and the main one is that clicking on the buttons will affect all HTML text on that page, and by clicking a button, all HTML text will be made to change to a single size.
To prevent the problem of all the text changing to the same size, it's best to use the "Default" size for your body text (which is, after all, the main text that you want to be affected by the increase/decrease buttons) and then use graphic text for the rest of the text.
The procedure for making a page like this is simple, but Freeway Pro users need to first make sure that the page encoding is set to HTML 4.01 Transitional (this is because the markup code you will use is written in HTML 4.01, and it will not validate if you set the page encoding to XHTML 1.0 Transitional for instance). To do this, make sure nothing is selected on the page, click on the Output Settings tab of the Inspector and check that the HTML popup is set to HTML 4.01 Transitional. Freeway Express users don't need to worry about this.
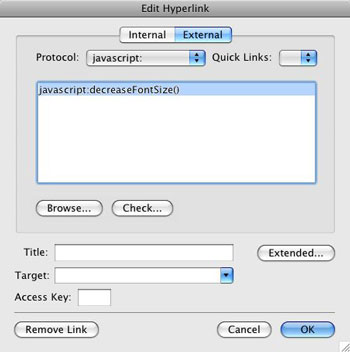
Now the items can be used on the Freeway page. Click on the HTML tool and draw an item on the page. Click inside the item and enter your text. Now draw two graphic items on your page to use for the Increase Text and Decrease Text buttons. Select the button you are going to use as the Decrease button, go to Edit>Hyperlinks, click on the External tab, click and hold on the Protocol popup, choose javascript: then enter decreaseFontSize() immediately after the colon in the panel - so that it looks like the screenshot below.
Repeat this process for the Increase button, but make sure that you use the text:
javascript:increaseFontSize()
in the Edit Hyperlinks dialog.
Finally, you need to add some HTML markup to the page. To do this, you first need to copy the code below
<script type="text/javascript">
var min=8;
var max=24;
function increaseFontSize() {
var p = document.getElementsByTagName('p');
for(i=0;i<p.length;i++) {
if(p[i].style.fontSize) {
var s = parseInt(p[i].style.fontSize.replace("px",""));
} else {
var s = 18;
}
if(s!=max) {
s += 1;
}
p[i].style.fontSize = s+"px"
}
}
function decreaseFontSize() {
var p = document.getElementsByTagName('p');
for(i=0;i<p.length;i++) {
if(p[i].style.fontSize) {
var s = parseInt(p[i].style.fontSize.replace("px",""));
} else {
var s = 14;
}
if(s!=min) {
s -= 1;
}
p[i].style.fontSize = s+"px"
}
}
</script>
With the code copied, go back to Freeway, go to Page>HTML Markup, click and hold on the Insert popup and choose Before </head>, then paste the code into the main panel of the Markup dialog and click OK.
Now preview in a browser to see it working.