What are Freeway Actions?
Both Freeway Pro and Freeway Express ship with a comprehensive set of Actions which you can use to add functionality and dynamic effects to Web pages—some of which we’ve already used in the Tutorial section.This section gives information on commonly-used “standard” Actions which come pre-installed, however many custom Actions can be downloaded free from ActionsForge (http://www.actionsforge.com). Other Actions, particularly complex ones, may be sold commercially on a developer’s web site.

Actions are comparable to plug-in modules, allowing you to add functionality or effects through the simplicity of an intuitive dialog box which would otherwise require sophisticated coding or repetitive formatting in other programs. An Action can be used for doing something as simple as making an image change color when a visitor mouses over it, or as complex as controlling forms and creating navigation bars. Others are part of a suite of Actions allowing you to create, for example, an on-line shop or sets of transition effects.
As stated earlier, this section will cover the standard pre-installed Actions, however Freeway Pro allows you to add further custom Actions which enhance the functionality of your web pages. Freeway Express only allows you to add Actions which have been encoded, so consult each Action’s documentation to see if it will work with Express. The download page for all Actions at ActionsForge gives details of which versions of Freeway any particular Action is compatible with.
The different types of Actions
Because there are different types of functionality you may want on your site, there are different ways to apply an Action in Freeway. The different types of Action are:- Item Actions: The most commonly-used Actions, which are applied to a specific item (or group of items) on your page. Note that some actions are specific to HTML items and others are only for graphic items.
- Page Actions: These are used on individual pages to apply functionality to the page itself.
- Standalone Actions: Another commonly-used type of Action, which creates a pre-coded HTML item on your page (sometimes called “insert” Actions).
- Folder Actions: These are used for applying an Action on a group of pages stored in a single folder. If all your site pages are stored in one folder, this can be used to apply site-wide functionality.
- Suites of Actions: Complex suites of many different types of Action. The individual Actions within the suite can be any of the above Action types. The Actions work together to provide functionality in your web site.
Applying Actions
Before you apply an Action, it’s best to have the Actions palette open so you can see that the Action has been applied. If it’s not open, choose Window>Actions.The way in which you apply an Action depends on the type of Action you want to apply:
- Item Actions: Select the item, choose Item>Action and select an Action from the list.
- Page Actions: Select the page you want to apply an Action to in the Site panel, then choose Page>Page Actions and select an Action from the list.
- Standalone/Insert Actions: Click and hold on the Action tool on the tool bar, choose the Action you want, then draw the Action on the page in the same way as you draw an item on the page. Alternatively, go to Insert>Actions and choose the Action you want. This method allows you to insert an Action into a text flow.
- Folder Actions: Select a folder you want to apply an Action to in the Site panel, then choose Page>Folder Actions and select an Action from the list. Another method is to click on the Plus (+) button in the bottom left corner of the Actions palette, then choose the folder Action you want to use.
The Actions palette
When no Actions have been applied to a selected item, page or folder, the Actions palette will be empty. To see how it works, let’s draw a graphic item on the page then apply an Action.Click on the Graphic tool on the tool bar and draw an item on your page. With the item selected, choose Item>Actions and select Buttons from the list.
You will now see that a tabbed panel has appeared under the title bar entitled “Buttons” and, within the panel, the various options of the Action are displayed. Depending on which Action you apply, the options may take the form of text fields, check boxes, pop-up menus, etc., but the options will always be specific to that particular Action.
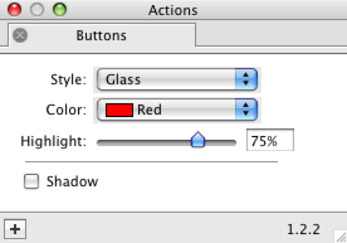
An item can have more than one Action applied at a time, so let’s apply another one. Choose Item>Actions and select Fade. You’ll see in the Actions palette that we now have two tabbed panels, the latest of which is now selected.
If you want to return to the Buttons Action, you’ll need to click on the Buttons tab.
Let’s apply a third Action. Choose Item>Actions and select Rollover. A third tabbed panel has appeared in the Actions palette, but this is a different type of panel in that it has more than one window which can be selected by clicking on the relevant button below the Actions tabs. The Rollover Action is currently showing the “Images” window. Clicking on the “Parameters” button displays a second panel of options.
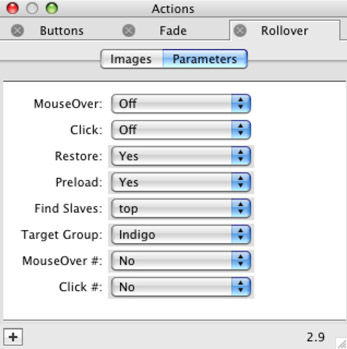
Although there are two separate windows, both are specific to the Rollover Action. This is done because some Actions have very different types of options which don’t lend themselves to being displayed in the same window. In this case, the Images window displays the options in a table-based layout, while the Parameters window is made up of a list of pop-up menus.
If you want to remove an Action from an item, simply click on the X in a circle to the left of the Action’s name.
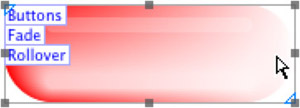
You may also have noticed that each time an Action was applied to the item on the page, a label displaying the name of the Action appeared in the top left corner of the item’s container. With all three Actions applied, three labels appeared underneath each other, giving a quick visual reference to which Actions have been applied.
If a page Action has been applied, the Actions palette will only display the options for that Action if no items are selected on the page.
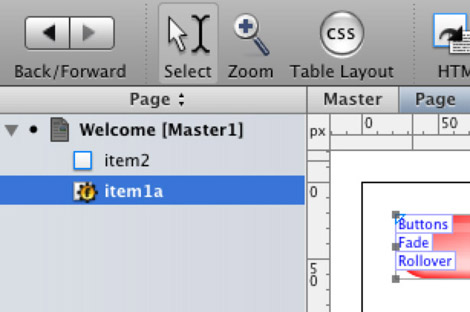
When an Action has been used, the Action "cog" icon will appear on the item, page or folder icon in the Site panel. This is a visual cue that it has an Action applied to it.
If a page Action has been used, the Action label will display on the top left corner of the page, and the Action cog icon will display on the page in Freeway's Site Panel.
Installing new Actions
Once you have downloaded new Actions, they are simple to install. Drag the Action file onto the Freeway application icon (either in the Applications folder or in the Dock), and Freeway will launch (if it's not already open) and inform you that you are about to install an Action. Click on the OK button to confirm that you want to install the new Action. Freeway will copy the Action file to the appropriate place on your hard drive.It is important to remember that Freeway Express can only use encoded Actions. These are marked as being specifically for Freeway Express on the download page for that Action on the ActionsForge site or in the text of a developer’s web site.
