When working in "table-based" layout (ie, without using items as "layer" items on the page), the most common reason for using parent and child items is when a colored item is used as a background - for instance if you want to have a different page color to the browser background color - but there are many other reasons as well.
Using a graphic item for a page background is not recommended as the graphic may break apart when an HTML text item is placed on top of the item when both items are table-based items (this is because browsers often render HTML text slightly larger and a graphic item used in this way will be "sliced" into smaller chunks around the HTML item) - as seen in the screenshot below.
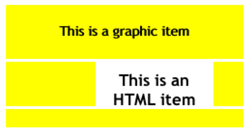
Notice the white lines running horizontally through the yellow background item which is caused by the HTML text increasing in size slightly in a browser. Using an HTML item as a page background and then using the other items on the page as children will prevent this problem from happening.
Note: You can test to see if any breaking apart of graphic items may occur by previewing the page in Safari then typing Command-+ to enlarge the default browser type size (typing Command and minus/hyphen will reduce the default size again, and typing Command-zero will reset the default size again). Although this will accentuate the problem, it is a useful testing tool.
The best way to learn about parent and child items is to follow the steps below while working in Freeway. To do this you can either create a new Freeway file or work on a new page (you can always delete the page after).
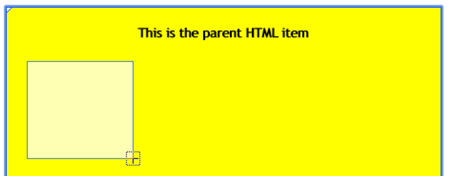
- In your new Freeway file or page, draw a large HTML item and give it a color of yellow. This item is going to be the parent item.
- Click on the HTML tool in the toolbar and draw a new, small HTML on top of the parent item. Note that when you draw the item, the cursor changes to a "+" symbol and the outside border of the parent item displays with a thicker line.
- With the new child item selected on the page, you will see that the border of the parent item is still displaying a thicker line. Now click and drag the child item to see that you can't move it outside of the parent - this is because the child item is embedded inside it rather than being on top of it.
- Notice also that when the child is selected you can see that the color is set to "None" in the "Inspector". Compare this with drawing a new table-based HTML item off the background area, entering some text inside it and then moving the item on top of the background item - which shows that the background of non-child table-based HTML items display in white (even though the color is set to "None" in the "Inspector"). This is because HTML child items within an HTML item parent are transparent (note that using an HTML text item as a "layer" item will also make the background transparent).
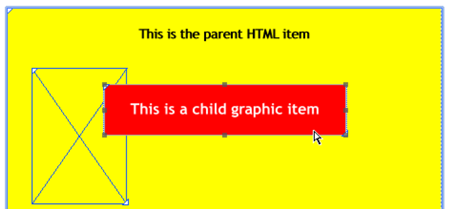
- Graphic items can also be used as child items. Select the Graphic tool in the toolbar and draw a new item on top of the parent item. Just like before, the cursor changes to a "+" symbol and the parent's border displays a thicker line. Again, this item can be moved around anywhere within the parent, but you need to take care not to let this item overlap the first item you drew - if you do, the first item will "overflow" because it's an HTML item (overflowing will cause the content to disappear and a large cross will appear in the HTML item's container as shown below). It is worth noting that HTML items will overflow if any item (HTML or graphic) is overlapping or on top of it.
- Click away onto a blank area of the page to deselect all the items and then click once to select the parent item. Note that it has a dotted line inside the normal selection line on the right and bottom edges - this gives you a visual reference that this item is a parent.
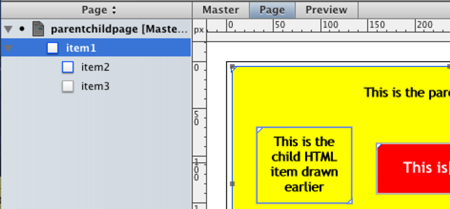
- Finally, click on the header bar of the Site Panel to the left of the page area, so that "Site" toggles to "Page". The Site Panel will now display a list of all the items on the page you are working on (see the screenshot below). Notice that "item2" and "item3" are indented one level to the right underneath "item1" - this means that items 2 and 3 are child items of a parent item called "item1". Click on the header bar again to toggle it back to the default "Site" view.
OTHER POINTS ABOUT PARENT AND CHILD ITEMS
- You can use graphic items as parents. However, you need to bear in mind that only a graphic item can be a child of graphic item - as HTML will not let you embed an HTML item inside a graphic item. This means that drawing a new HTML item on top of a graphic item will not result in the new item a child, and trying to select a graphic item and then pasting a cut HTML item inside it will not work (nothing will happen if you try).
- If you click and drag on a parent item, the child items remain in position within the parent as it moves.
- If you delete a parent item, you will also delete any child items within it.
- You can embed child items within other child items. There is no official limit on the amount of levels of parent/child relationships, but bear in mind that the code required to produced more than, say, 10 levels may be quite complex, so it's good practice to use as few levels of embedding as possible.
- If ever you find you've have made an item a child of another item by accident, you can sever the parent/child relationship in one of two ways. The first way is to select the child item, go to Edit>Cut, make sure nothing is selected on the page and go to Edit>Paste (you may need to move the item if it now overlaps any HTML items). The second way is to click on the header bar of the Site Panel (see the last of the steps above) then click and drag the item to the left by one level (so that it is no longer indented one level to the right of the parent item in the list).
- Finally, when pasting an item inside another item as a child, you need to be aware that the position of the cut item will be remembered by Freeway (as Left Inset and Top Inset pixel values from the top left corner of the page), so when you select an item and paste the item inside it, it will use those Left Inset and Top Inset values from the top left of the parent item. Because of this, it is usually best to first move the item you are about to cut so it is at (or near) the top corner of the page area before cutting it.