Here we will run through the steps used to implement a jQuery horizontal scrollbar similar to the one which can be found at http://jquerytools.org/documentation/rangeinput/ so it can be used to make content within an item on a page scroll horizontally - but please note that we cannot give specific support or instructions for other JavaScript functionality you may find on the web. This is because the way the code is used and edited (sometimes by doing your own hand-coding) varies greatly from one to the next - and many of the sites which offer the code give very limited details of how it needs to be used, sometimes to the point that only those with excellent coding skills will be able to use it.
As you will see, this is a long and complex procedure - and this will be the same with any other web design application unless a Freeway Action (or a similar method in other applications) is available to use to simplify the process.
It is very important to note that mixing and matching JavaScript libraries on the same page will often cause conflicts. This means that using jQuery functionality on a page will break the Scriptaculous functionality used by many Freeway Actions. This will be discussed later in this article with a specific example. Sometimes this can be fixed by specifying some "NoConflict" code - however, this cannot be fixed with this particular jQuery function without a major rewrite of the supplied jQuery code.
Overview
We are often asked by customers how a particular website has used some special functionality, and they ask if this can be done in Freeway. Sometimes there is a Freeway Action that someone has written (which may be one that we supply or one written by a third-party author) - which is by far the simplest way to achieve that result (or something very similar) - but sometimes a specific JavaScript library effect has been used or it may even have been hand-coded.
Essentially, just about anything can be achieved in Freeway - but you need to appreciate that this type of functionality can often only be done with good knowledge of JavaScript, CSS, HTML and sometimes other coding languages. It is often the case that the code already exists and is offered free on the Web so you can copy and paste the code (or enter the path to a "referenced" .css and .js file) into the Head and/or Body tags of the page or used inside a markup item. The way that code is used will vary greatly from one solution to the next, and there is no specific standard in how it is implemented or with the naming conventions given by such sites.
jQuery - one such specific JavaScript library - is a cross-browser library which lets web designers include complex and elegant functionality on their sites, and it usually works reliably on both Mac and PC browsers. More recently, however, many jQuery solutions use CSS3 features which may vary in appearance from platform to platform and browser version to browser version - this is because CSS3 is not currently supported by Internet Explorer for PC and earlier versions of Firefox (for Mac and PC) only support certain CSS3 attributes. On the whole though, the main functionality usually works in the vast majority of browsers, even if the appearance differs slightly.
Getting the necessary code and files
Unfortunately, the original page where I obtained the code is no longer available (which is something that makes it difficult for us to offer tutorials like this over a span of more than a few months), so I will write below on what code I found when visiting that original page.
In the section under the "HTML coding" heading, I found the code:
<div id="scrollwrap">
<div id="scroll">
jQuery TOOLS 1.2.5 Rangeinput. HTML5 ranges for humans.
</div>
</div>
which told me that on the Freeway page there needs to be an HTML "Layer" item (called "scrollwrap") which has a "child" HTML Layer item (called "scroll") nested inside it. We can see this because there is a new "div" inserted before the closing "end div" (</div>) tag. The "scrollwrap" will be the "window" inside which the wider "scroll" item will be the content that slides across the window when the scrollbar below is clicked and dragged on in a browser.
Note that a "div" is a Layer item on the Freeway page (either drawn on the page with the CSS Layout button switched on, or by selecting the item and then switching on the Layer option in the Inspector). Layers are only supported in Freeway Pro, which means that Freeway Express users will not be able to use the vast majority of JavaScript library functionality. For this functionality to work, the code needs to be able to target a specific "div" item (by looking for its "div id" name), so it can't be done with simple "table-based" items.
Also on that page was a link to see a page with just the bare bones of the functionality you need to implement displayed (without the clutter of the main page) - and if there is such a link for any code you wish to use, it is worth using such a link as it makes it easier to concentrate on the specific code that gives the effect its functionality.
Because you will be copying and pasting code from the browser window into Freeway, it is important that you have a dedicated HTML Editor application to use so that only the pure code will be copied into Freeway. If you don't already have a dedicated HTML Editor, you might want to download and install the free application called TextWrangler from http://www.barebones.com/products/textwrangler/.
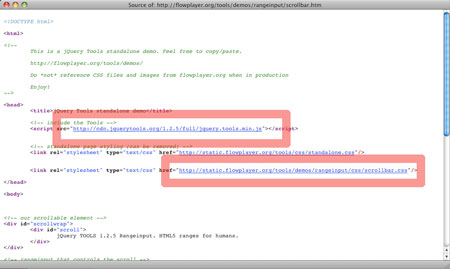
To grab code you first need to view the source code of the page (if it's not given in a dedicated panel on the page). In Safari go to View>View Source, in Firefox go to View>Page Source to open a new window containing the source code of the page. Here I found a link in the "head" tag of the page for a "script" called "http://cdn.jquerytools.org/1.2.5/full/jquery.tools.min.js" (which is marked in the red rectangle in the screenshot below) which I clicked on to open a new browser window (or tab, depending on how your browser prefs are set up). I clicked inside the new browser window, selected all the text, copied it, launched TextWrangler, pasted in the copied code and then went to File>Save and saved the file to my hard disk with the name of "jquery.tools.min.js" (without the quotes). Next, I did the same for a second link (also highlighted in the screenshot below) - which is a "stylesheet" link - by clicking on the link called "http://static.flowplayer.org/tools/demos/rangeinput/css/scrollbar.css" (I ignored the "standalone" .css file link) and saved that to my computer as well, giving it the name of "scrollbar.css" (without the quotes). After that I closed the source code window.
Editing the .css file
The scrollbar.css file contains many attributes which are not required - and it's best to remove this code. The reason this code should be removed is because Freeway will use its own attributes for the items when the file is published, and some of it was specifically used to display the content of the scrolling area on the sample page. Note that many of these attributes can be edited to change the color of the slider button, the slider track, etc., but always make sure you work on a copy of the original in case you need to revert to the original file.
I opened the scrollbar.css file in TextWrangler and removed the attributes highlighted in red in the screenshot below and then saved the file. With the two files (the .css and the .js files) kept safe I could then set up things on the Freeway page itself. If you want to follow along from here, you can find the .css and .js files in the Media folder that's inside the downloaded Zip file.
Setting up the items on the Freeway page
Below are the steps used to create the sample Freeway Pro file which you can download using the Download link below the end of this article.
Launch Freeway, create a new file, make the page width 1000px and set the alignment of the page to Center. Next you need to make the pasteboard area around the Freeway page larger so that there is room to use a very wide "div" on the page to contain the scrolling content - to do this, go to File>Document Setup, enter 2000px in the Pasteboard width field, and click OK to close the dialog. Because the "pasteboard" is square, this also gives it a height of 2000 pixels.
Give the page a background color with a Hex value of FEEABE and then switch on the CSS Layout button on Freeway's toolbar (so it displays in blue). Draw a new HTML item near the top of the page, click inside it and type "jQuery Horizontal Scroller Sample" to use for a heading. Select the text, use Georgia for the font, 36px for the size, align it Center and give it a Hex color value of 993300. With the item selected, go to the Inspector to enter a Left Inset value of 0px, a Top Inset value of 45px, a Width of 1000px and a Height of 41px. Type a Return or Tab after entering the final value in the Inspector, click inside the Inspector's Title field and give it a name of "header" (without the quotes).
Draw a new HTML item on the page, give it a Width of 1000px and a Height of 440px, then position it with a Left Inset of 0px and a Top Inset of 154px. Give this item a background color of E6E6E6, then click on the Inspector's Overflow popup and choose Hidden. Click inside the Inspector's Title field and give it the name of "scrollwrap" (without the quotes) - note that it is very important to use exactly the same name as the items in the example on the web page because the code explicitly targets an item by using its name.
Draw a new HTML by drawing on top of the scrollwrap item. Because this is drawn on top of the scrollwrap item, this will make the new item a child item of the scrollwrap item. With the child item selected, enter 2224px for Width, 401px for Height, 0px for Left Inset and 20px for Top Inset, then click on the Inspector's Overflow popup and choose Hidden. Finally, give the item a Title of "scroll" in the Inspector. If you zoom out in Freeway you will see that the scroll item is much wider than its scrollwrap parent and it is poking out far to the right of the page - this may look odd, but this is how it needs to be.
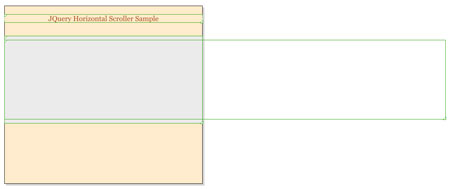
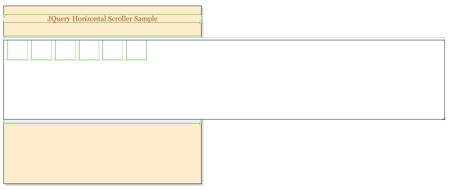
With the scroll item created, the scrolling content can now be nested inside this item. There are different ways to do this, but I used the graphic items as "inline" items as this makes it more reliable and easy to achieve the same spacing between each item. Double-click on the scroll item (so you see the flashing text cursor in the top left corner of the item) and go to Insert>Graphic item. This will place an item 100px square inside the scroll item. With the item selected, choose Left in the Inspector's Align popup, choose Custom in the Margin popup, enter 20px for Left and 0px for Top, Right and Bottom then click OK.
With the inline item still selected, copy it (Command-c) then either double-click to the right of the item or use the Right Arrow key on your keyboard to move the flashing text cursor to the right of the item. Now paste the item in five times so that you have a row of six items aligned left within the scroll item.
When you click on the Download link below this article you can get a Zip archive which contains an "archive" of the Freeway file (which was created using the steps here) along with a folder called "media for jquery sample" and a PDF of this tutorial text (with screenshots). The Media folder contains six images which have been scaled and optimized in Photoshop so they are all 400px high. You can now import these images in number order into each of the inline items as "Pass-through" images. A Pass-through image is a special type of image which Freeway will not optimize further when the file is published - but you need to be aware that pass-throughs cannot be cropped and scaled, so this needs to be done beforehand. Select the left-hand inline item and go to File>Import, select the graphic starting with "01", check the Pass-through option checkbox and click Open. Because a Pass-through image cannot be cropped, you will see that a large "X" appears inside the item (this is because the item is "overflowing") - go to Item>Fit Box to Content to make the graphic appear. Repeat this for images 2 to 6.

Note that items which are entirely off to the right side of the Freeway page area will display in the Site Panel with an "X" through the item's icon - this is normal, and it is simply telling you that the item is on the pasteboard area and not on the page.
The final item on the Freeway page is what will display as the slider to scroll the content of the scroll item within the scrollwrap window and this item needs to be a "markup item". I grabbed the code that will be used in the markup item by copying it from the source code of the original page (where the other code was taken from). The code I took for the markup item is below - so copy the next two lines.
<!-- rangeinput that controls the scroll -->
<input type="range" max="2600" step="10" />
Go back to your Freeway page, go to Insert>Markup item, paste the code inside the HTML Markup window and click OK. This will place an item on your page with <H> in the top left corner (which signifies that it's a markup item). With the item selected, use the values of Width = 748px, Height = 40px, Left Inset = 123px, and Top Inset = 636px. Finally, enter "slider" (without the quotes) in the Inspector's Title field.
The code you pasted into the markup item needs to be edited - this is because "max" value is the value used specifically for the horizontal scroller on the sample web page. The "max" value needs to be calculated then entered for each different scroller, and for this the formula is the width of scroll item minus the width of the scrollwrap item. In this case, the scroll item is 2224px and the scrollwrap item is 1000px - so the value that needs to be used is 1224px. Double-click on the markup item to display the HTML Markup dialog again, then change 2600 to 1224 in the code and click OK.
The "step" value controls the smoothness of the scroll for the items in the scroll window. You should leave this as 10.
Using HTML Markup in the Freeway file's body tag
Going back to the page where I grabbed the previous code and looking at the source code again, I found some "script" code which was used in the "body" tag (see screenshot below).
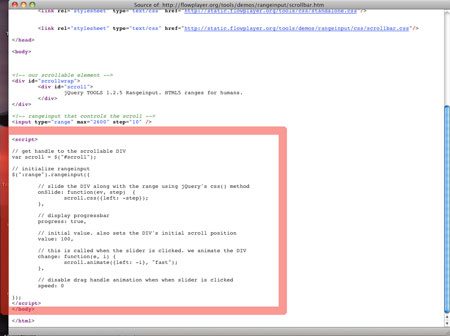
The code highlighted in the screenshot above (ie, the code starting with <script> and ending with </script>) was the code I needed - and I've reproduced that code below, for you to copy (from <script> to </script>):
<script>
// get handle to the scrollable DIV

var scroll = $("#scroll");
// initialize rangeinput

$(":range").rangeinput({
    // slide the DIV along with the range using jQuery's css() method

    onSlide: function(ev, step)  {

        scroll.css({left: -step});

    },
    // display progressbar

    progress: true,
    // initial value. also sets the DIV's initial scroll position

    value: 0,
    // this is called when the slider is clicked. we animate the DIV

    change: function(e, i) {

        scroll.animate({left: -i}, "fast");

    },
    // disable drag handle animation when when slider is clicked

    speed: 0
});

</script>
Go to your Freeway page, go to Page>HTML Markup, choose Before </body> in the Insert popup, paste the code into the main panel and click OK.
Do not edit the code, as it is fine as it appears in the source code of the web page. You can now close the source code window as you won't need the page any more.
Referencing the external .css and .js files
The final part of the procedure is to make sure that the "scrollbar.css" and "jquery.tools.min.js" files you saved earlier can be found and used by the page when the Freeway file is published. If the file cannot find these files, the functionality will not work. There are a few different ways to do this, but the simplest method is to use two Freeway Actions that you can download free from ActionsForge. Using these Actions will mean that you won't need to manually upload the files to the web server and it also means that Freeway will place the files in their correct location.
Visit the pages at http://www.actionsforge.com/actions/view/23-ess-use-external-style-sheet and http://www.actionsforge.com/actions/view/46-external-javascript and download then install both Actions. Make sure nothing is selected on your Freeway page then go to Page>Page Actions and choose ESS-Use External Stylesheet. Open the Actions palette, switch off the Delete Embedded Styles and Use Site Pages As Stylesheets options then click on the top CSS: popup in the right-hand column of popups and select the file you saved earlier called "scrollbar.css". Finally, go to Page>Page Actions and choose External Javascript, then in the Actions palette click on the File 1 popup, select the file called "jquery.tools.min.js" you saved earlier.
You can now preview the file in a browser to test that everything works (because you are using the Actions you won't need to upload the files to test it). When Freeway publishes the code, it will move the .css and .js files into the correct location within your Site Folder and you should be able to see it all working. As mentioned earlier, the benefit of using the ESS Actions is that these files will also be uploaded into the correct location on your web server when you upload the rest of your files.
Important points to note
Just as with all scrolling content used on a web page, this horizontal scrolling method will not work when viewed on an iPhone or iPad. This is because scrolling areas can only be scrolled by using two fingers together on the touch screen. Because the scroller button is too small, the functionality will not work.
Another important point is to be aware that some additional functionality often used in Freeway will not be compatible if used on the same page - and this is because you will be mixing and matching different Javascript libraries. An example of this is if you want to click on one of the scrolling images to view a large image in a "lightbox" effect using an Action such as the ScriptyLightbox2 Action (which is available for free download from ActionsForge.com. Because Scripty Actions use the Scriptaculous Javascript library, this conflicts with functionality created by using jQuery Library effects. It may be possible to "de-bug" such conflicts, but that can often only be done by making major edits to the jquery.tools.min.js file.
Trying out the attached file (at the foot of the article)
If you want to try following the steps in this tutorial as you build this horizontal slider, please be aware that you will need to relink the .css file and the .js file which are referenced in the Use External Stylesheet and External Javascript Actions. To do this, go to each Action in turn, click and hold on the relevant popup in the Actions palette (where you can see the file's name, even though it isn't actually linked), then link to the file again in the Media folder of the Freeway Archive folder. Once you have relinked the two files, it should all work fine when you preview the file in a browser.
jquery_tutorial_files.zip (3.2 MB)
